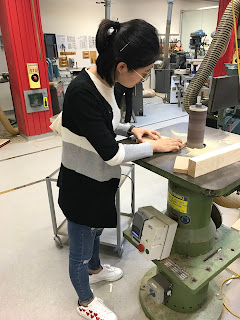
Posts

Showing posts from April, 2017

4. Blister

Image
We had this special made mode for our blister, which was first cut half done by machine and then we hand sawed the middle part out. At last, we used the electrical sander to make the edge smooth, in order to prepare for making blister. What I did was basically use the pointed head hammer strike the edge of the water drop inwards the mode. Then use the round head side to concave that shape in more. The process was pretty similar as how we made the bowl. The difference is we needed to define the edge of water drop more clearly, so I put a pointed head hammer right against the edge and use another round head one to strike it, which can make the force goes more evenly into the sheet.  This is how it looked like out of the mode. I used the English wheel to make the curved surface smooth, which is the same process as what I did in the first blog of making bowl. The result is looking good. I like this one the most out of the 4 pieces I have made.😜 The other piece my

3. Tray

Image
My partner and  I picked a piece of timber then use the bandsaw and sanding machine to make us a templet. The timber templet (forgot to take photo right after I made it, this is the one I took while I was doing the tray, but you can still get the shape of what we made, which is a rectangle base with 4 rounded corner) We placed the templet right in the centre of the sheet, and used the flat hammer to strike 4 edges folded 90 degrees.  Be careful of the 4 corners, they were really hard to make. Once you strike one side down, the other side will raise up. This step needs patience. Just strike gently and evenly on every spot it will become the shape you wanted. After I have done the rudiment, I took the tray and templet off the clap. It was a bit un-flat on the base. I put it on the sand bag and hit on the templet to make it flat again. This is basically what it looks like.  Because we were using the same templet, my partner Shanshan's tray and mine are

2. Torus

Image
To make the torus, other 2 students and I shared one square aliminum sheet and divided into 3 evenly. I used the guillotine, which is pretty heavy to step down. Then I got my long rectangle sheet. Then I used this machine to roll the flat sheet into a half circle.  Here is the wooden mode clapped besides the bench, which is used to make the major curve shape in the middle of the torus. I used the pointed head hammer to strike it down and make it close to the mode shape as possible as I can, in order to make the torus more curvy. Then use this bent T-shape mode and the flat head hammer to curve the two side down gently. I did this from the end of torus, and fit the curve closely to the mode. Its shape changed easily so I have to check occasionally if it lost its shape while striking. This is the result. I thought this shape was really hard to make and had no idea where to start, but once I started, it's actually not that tough and pretty interesting to make. 

1.Bowl

Image
We started with a piece of flat square aluminium sheet. I drew an inscribed circle on it and cut it out, which is the foundation of the bowl. Then I drew the center of the circle and several concentric circles according to it, so that I can aim easily. Then I strike the outer side of the circle to make it wrinkle up using the wooden mode and the pointed side of hammer, like everyone else did. It was so much more harder then I thought. The first few strikes were fine, but my hands got more and more sour and the hand holding the metal down hurt by the vibration while striking. What to do next is striking the wrinkles down using the rounder side of hammer and make it concave into the mode. Then repeat this movement for hundreds of times, until the metal sheet has a rough bowl shape. Next step is using this mushroom shape mode to define the unflatten detail of the bowl using the small flat-headed iron hammer tapping gently and constantly. The metal started to be more and more